

It's Sunday, 11:52 p.m. Your sale ends at midnight, and you're still at the laptop with a spreadsheet of original prices. There are 140 products to put back before Monday's traffic arrives.
That is what "scheduling a sale" looks like in a lot of Shopify stores: a calendar reminder and a person. It works until it doesn't. A variant gets missed, a price stays at 20% off for a week, or the launch email goes out an hour before the prices actually change.
This guide walks through the alternative: a sale that is configured once, starts at an exact time, runs with the right storefront elements, ends on schedule, and puts every price back by itself.
By the end you'll know:
- what actually needs to happen at the start and end of a sale (more than you'd think),
- the difference between scheduling a Shopify discount and scheduling a product price change,
- how to prepare a campaign so it can be automated safely,
- how to schedule it in Disco, step by step,
- what happens at the start time and the end time, and
- a pre-flight checklist plus four worked examples, from a four-hour flash sale to Black Friday.
Why sale scheduling is more than a start date
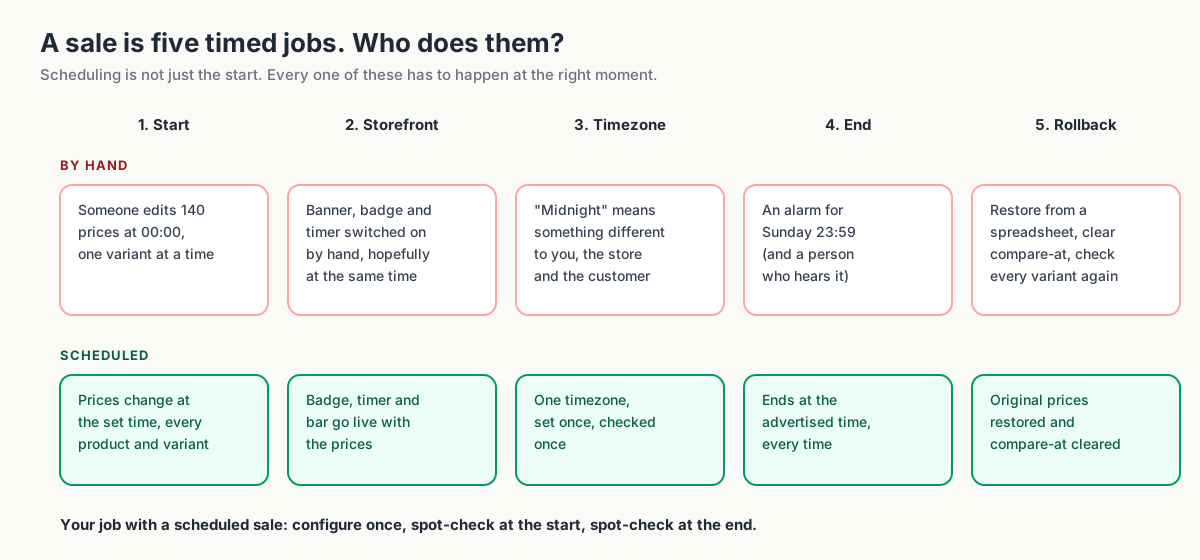
A sale needs more than a launch time. Plan these five things together:
- Start. Apply the offer to every selected product and variant.
- Storefront. Show the badges, countdown, announcement bar, and sale collection when the prices change.
- Timezone. Use the scheduler's timezone for both the campaign and your launch messages.
- End. Stop the offer at the advertised deadline.
- Price reset. Restore the original prices and remove the campaign's sale styling.
Set these up in advance, then leave time for a quick check at the start and end.
Scheduling Shopify discounts vs. product price changes
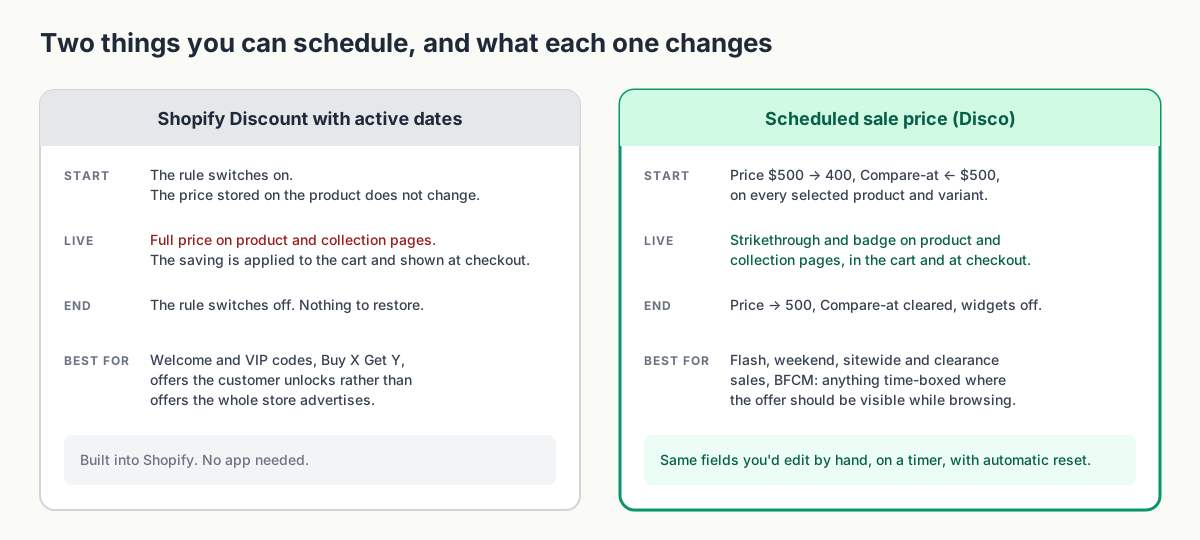
Shopify's Discounts section lets you set start and end dates for a code or automatic discount. For a timed VIP code or welcome offer, that may be all you need.
Those dates control the discount rule. They don't change the product's stored price, so shoppers generally see full price while browsing and the saving when the discount applies in the cart or checkout.
If you want the sale visible on the product page (struck-through original price, sale badge, "Save 20%"), the product's Price and Compare-at price fields have to change. The standard Shopify product editor has no schedule attached to those fields. You can edit them at the right moment or use a scheduling app to apply and reverse the changes.
That's the distinction this guide is built on:
| You want to schedule… | Use | Customer sees the offer |
|---|---|---|
| A code or automatic discount (welcome offer, VIP code, Buy X Get Y) | Shopify Discounts with active dates | At checkout |
| A visible sale price across many products, with automatic reset | A scheduled sale-price campaign (Disco) | On product and collection pages, in the cart, and at checkout |
For more on choosing between the two, see How to show sale prices on Shopify product pages before checkout. Below, we'll focus on scheduling visible sale prices.
Can I schedule sale prices without Shopify Plus?
Yes. A sale-scheduling app such as Disco can schedule product price changes and restore the original prices without Shopify Plus. You can also schedule discount codes and automatic discounts directly in Shopify. Those dates control the discount rules; they don't schedule changes to the product's price fields.
How to prepare the campaign
Decide which products belong in the sale and how much you can reduce them before opening the scheduler.
Define the goal
Pick one: revenue over a short window, clearing specific stock, or bringing new customers in. The goal decides the discount depth, the product selection, and whether you let discount codes stack. A clearance campaign can go deep on old stock; a weekend revenue push usually shouldn't touch new arrivals at all.
Select products by rule, not by hand
Describe the sale in a sentence you could hand to a colleague: "Everything in the Outerwear collection, except products tagged new-in." If you can say it, you can filter it, by collection, tag, product type, or vendor. A rule-based selection is repeatable next month and much harder to get wrong than a hand-picked list of 140 products.
Choose exclusions
Decide what stays at full price before you decide the discount: new-season stock, low-margin lines, hero products, anything already reduced. Exclusions are how a "sitewide" sale stays profitable.
Calculate the margin floor
Work out the lowest price you can afford before you choose a percentage, and check it against a real product rather than a store average:
| Full price | 20% off | 30% off | 30% off + 10% welcome code | |
|---|---|---|---|---|
| Selling price | $500 | $400 | $350 | $315 |
| Cost of goods | $300 | $300 | $300 | $300 |
| Contribution | $200 (40%) | $100 (25%) | $50 (14%) | $15 (5%) |
A 30% sale cuts the amount left after product cost from $200 to $50—a 75% drop. Add the welcome code and only $15 remains, before shipping, payment fees, or other costs. Check those extra codes before launch.
How to schedule a Shopify sale with automatic price changes
Disco updates Shopify's Price and Compare-at price fields on a schedule. Your theme displays the offer using those fields, just as it would after a manual edit.
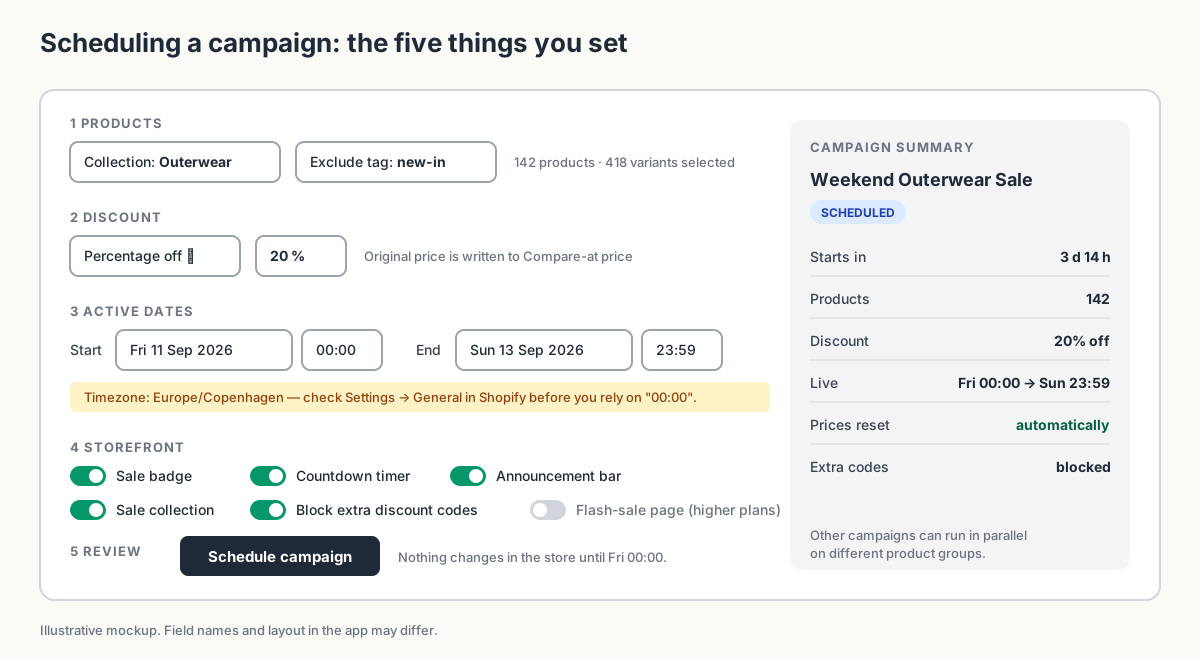
1. Select products with filters
Choose products by collection, tag, product type, or vendor, then add exclusions: Outerwear collection, exclude new-in. Review the product list and count before moving on.
2. Set the discount
Choose a percentage or a fixed amount off. Disco calculates the new price for every selected product and variant and records the current price as the compare-at price, which is what makes the strikethrough and sale styling appear in your theme.
3. Set active dates
Enter both the start and end dates and times. You can schedule separate campaigns for different product groups, such as a weekend outerwear sale and a month-end footwear clearance. Check that their selections don't overlap unintentionally.
4. Choose storefront elements
Turn on what the campaign should show while it's live: a sale badge on product cards, a countdown timer that ends when the campaign does, an announcement bar, and a sale collection that gathers everything on offer in one place. On higher plans you can also attach a dedicated flash-sale page that publishes at the start and comes down at the end, and a coming-soon page that runs beforehand and collects email addresses for the launch.
If the sale price is meant to be your floor, this is also where you block additional discount codes for the duration of the campaign.
5. Review and schedule
Check the product count, the discount, and the dates one more time, then schedule. The campaign now sits in a scheduled state until its start time.
Which timezone does a scheduled Shopify sale use?
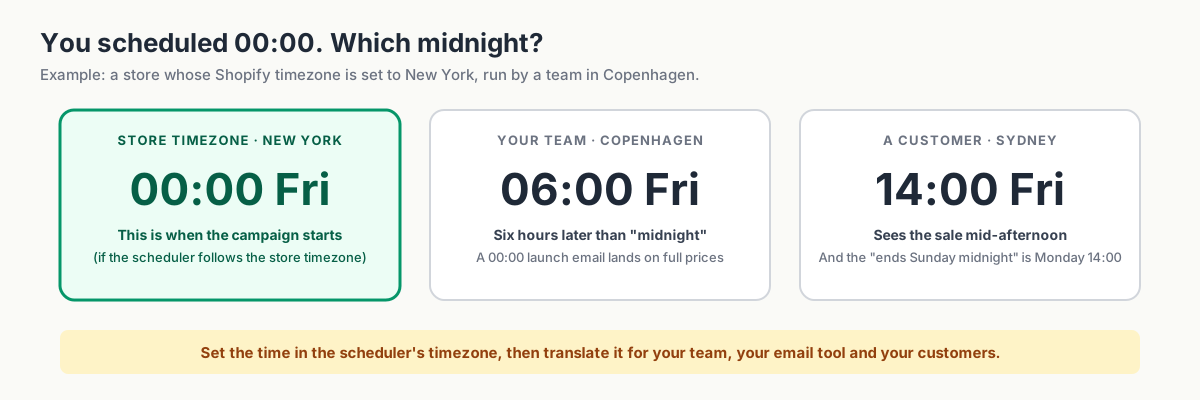
The scheduler uses the timezone that your browser uses. Check the timezone abbreviation above the dates, when you configure the sale in Disco. Record the timezone in the campaign brief, then match your email and social schedules to it.
For your first test, choose a daytime start. It's easier to check the storefront at 09:00 than at midnight.
How do sale prices change when the scheduled sale starts?
At the scheduled moment, Disco:
- writes the new sale price to
Priceand the original price toCompare-at priceon every selected product and variant, so the strikethrough appears on product pages, collection pages, in the cart, and at checkout; - switches on the storefront elements you chose: badge, countdown, announcement bar;
- makes the sale collection available and, on plans that include it, publishes the flash-sale page; and
- blocks additional discount codes, if you enabled that.
Your job at this point is a five-minute spot-check, ideally in an incognito window so you're not looking at a cached page:
- Open one product from the campaign. Confirm the strikethrough, the sale price, and the badge.
- Open a product with several variants. Check a variant that isn't the default.
- Open a product you excluded. Confirm it's still at full price.
- Add a sale item to the cart and go to checkout. Confirm the price carried through and behaves the way you decided with any live discount code.
- If you sell in more than one market, repeat step 1 in a second market.
If everything checks out, close the laptop. That's the point.
How to automatically restore original prices after a Shopify sale
At the end time, Disco restores each product to the price it had before the campaign started and clears the compare-at value, so nothing lingers looking like it's still on sale. The badge, countdown, and announcement bar switch off; the flash-sale page is unpublished; discount codes work normally again.
Two things are worth knowing about the reset:
Disco restores the prices it recorded at the start. If you manually change a product's price while it's inside an active campaign, you're now working against the campaign: your edit can be overwritten, and the price restored at the end will be the one Disco saved, not your new one. Make permanent price changes before a campaign starts or after it ends, never in the middle.
You can end a campaign early. If a product sells out or the sale needs to stop, deactivate the campaign and the same restore runs straight away. Know where that control is before launch day; it's the one button you want to find without searching.
Then do a post-sale check that mirrors the start-time one: one campaign product, one variant, one excluded product, and a quick look at the cart. If a price didn't restore, check whether another system is writing prices to the same products (more on that below) before you edit anything by hand.
Checklist before scheduling a Shopify sale
Run through this the day before your first real campaign, and keep it for every one after.
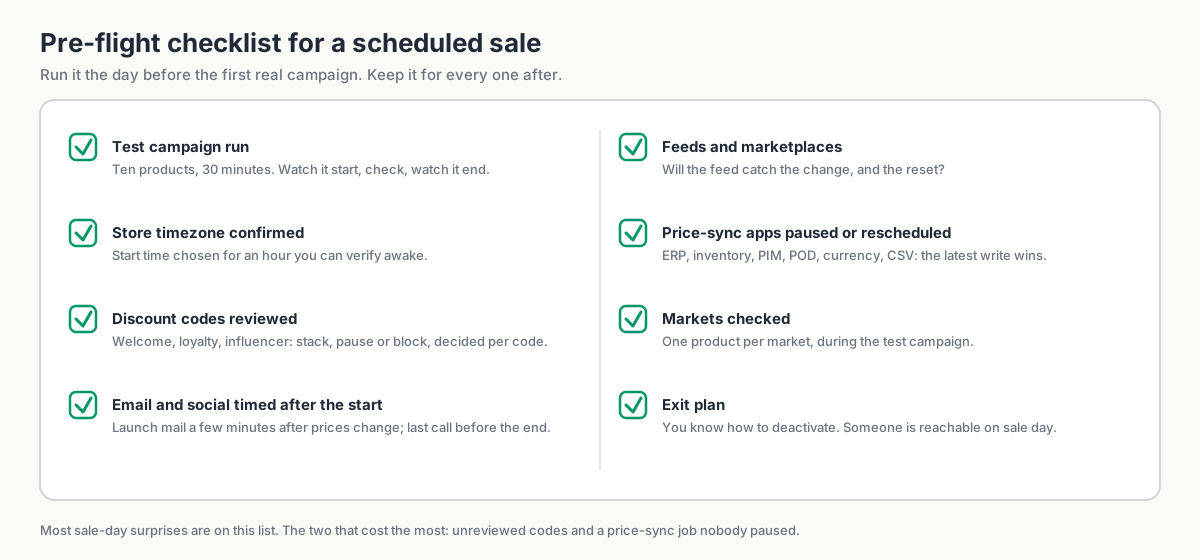
- Run a test campaign first. Ten products, 30 minutes, tomorrow morning. Watch it start, check the storefront, watch it end. The free plan is enough for this.
- Timezone confirmed. Store timezone checked in Shopify; start time chosen accordingly.
- Discount codes reviewed. List every code that will be live during the sale window: welcome, newsletter, influencer, loyalty, win-back. Decide whether each may stack on the sale price, then block or pause the ones that shouldn't. (Stop discount stacking and protect margin walks through this in detail.)
- Email and social timed to the start, not before. Schedule the launch email for a few minutes after the start time, and the last-call message a few hours before the end.
- Product feeds and marketplaces. Google Merchant Center and marketplace feeds pick up price changes on their own schedule. For a very short sale the feed may never catch up; for a longer one, make sure it does, and that it also catches the reset.
- Price-syncing apps paused or scheduled around the sale. ERP, inventory, PIM, supplier or print-on-demand, currency, and CSV/bulk tools can all write to the same price fields. Shopify keeps the most recent write, so an hourly ERP sync will quietly undo your sale an hour in. Disable price sync for the window, exclude the campaign products, or move the sync job to before the start. When a Shopify discount disappears: troubleshooting price sync covers how to find the culprit.
- Markets checked. If you use market-specific pricing or a currency app, test one product per market during the test campaign.
- Exit plan. You know how to deactivate the campaign, and someone is reachable if a customer reports a wrong price.
Shopify sale scheduling examples: flash sales, weekends, and BFCM
Use the same setup for each of these. Adjust the product selection, timing, and messages to suit the offer.
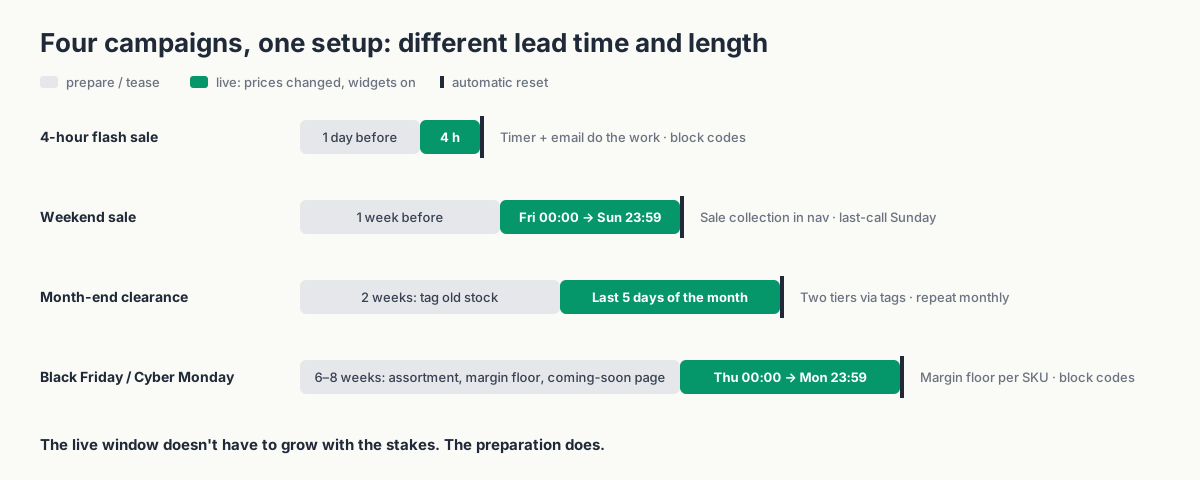
A four-hour flash sale
Tuesday 18:00–22:00, 30% off one collection.
Use a countdown and an announcement bar with the end time, then send the launch email at 18:05 after checking the prices. Block extra codes if your margin calculation requires it. Product feeds may not refresh within four hours, so plan the campaign around email and social traffic.
Weekend sale
Friday 00:00 to Sunday 23:59, 20% off sitewide, excluding new-in and gift cards.
Link the sale collection from your homepage and navigation, show badges on the sale products, and send the launch email Friday morning. Schedule a last-call message for Sunday afternoon. Choose who will check the launch and reset.
Month-end clearance
Last five days of the month, two tiers.
Tag old stock clearance-25 and clearance-40, then run a campaign for each group. Review the tagged products before reusing the setup next month. On plans with auto-tagging, the campaign can also populate an automated "Clearance" collection.
Black Friday / Cyber Monday
Thursday 00:00 to Monday 23:59, headline discount on a curated assortment, scheduled weeks ahead.
Check margins on individual products and build the sale collection early. If your plan supports it, launch a coming-soon page and waitlist two to three weeks ahead. Decide how codes and early access will work, then schedule and test each phase. Our BFCM playbook takes you from eight weeks out to the Tuesday-morning checks after Cyber Monday.
Schedule the next one, then go to bed
Give your next sale a start time and an end time you can leave to Disco. Begin with ten products and a 30-minute test tomorrow morning. Once you've checked the launch and reset, reuse the setup for your next campaign—and reclaim those late Sunday nights.
Install Disco from the Shopify App Store →
For plan limits and pricing, see our current plans page.
Next: Bulk discounts in Shopify: put hundreds of products on sale without CSV applies the same scheduled campaign to a large catalog, and The 2026 BFCM playbook: plan your biggest sale months ahead turns it into a full Black Friday plan.